On a previous post I discussed my first attempts at reproducing the Na-sulfamate based Zn-Br battery published by a group of Chinese researchers. My results showed that the chemistry works mostly as they showed, but I was unable to reproduce both the capacity and stability properties of their testing results. This post summarizes some additional research results I obtained with this chemistry and why, I believe, my results have been unable to match theirs.
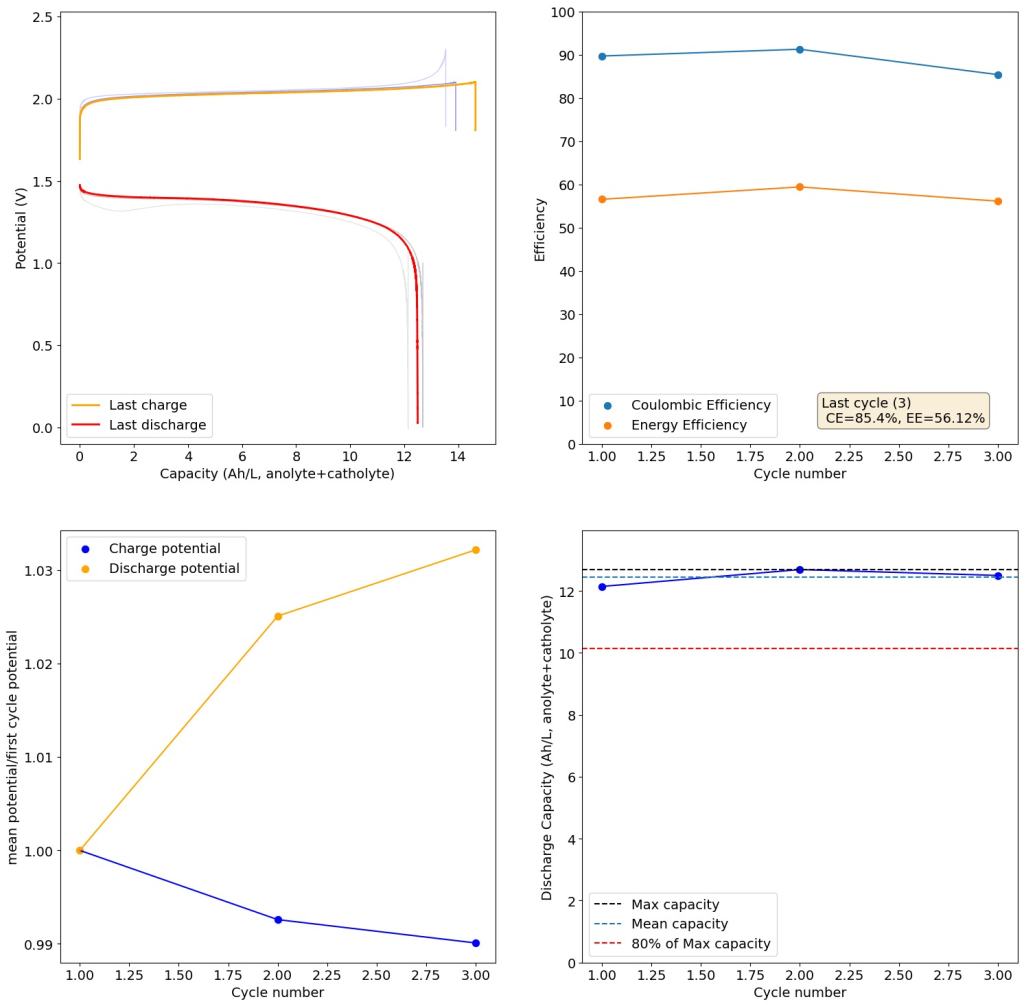
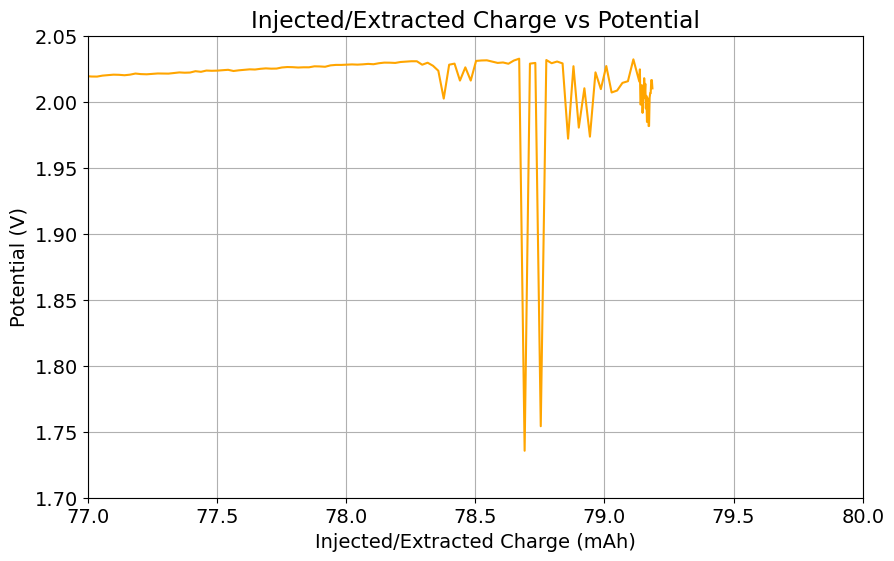
From the get go, my results showed significant declines in capacity when charging to the Nernst limit. This happened even at lower capacities and even at lower concentrations. Oftentimes with deterioration of the charging potential but sometimes with no changes in charging potential at all. This was irrespective of whether the buffer was prepared with just KAc additions, with HAc+KAc or with different buffer strengths. Additional HAc additions did not recover this capacity, which makes me believe that the losses are due to some permanent loss of the sulfamate inventory. Since these losses often happened with very little or no deterioration of the average charging potential, it also makes me believe these are not due to problems with Zn dissolution. After I opened the batteries I also saw no accumulation of metallic Zn on the anode felt or separator (while when it’s a problem with Zn reversibility you see some clear dead Zn remains).
If you read the original Nature paper carefully, you’ll also see that none of their charge curves ever reach the Nernst limit but they are carefully capacity limited to some predetermined value. This initially makes no sense – why would you choose to not use all your capacity? – unless there was a problem with either Zn dendrites or with some other side reaction. Given that Zn dendrites don’t seem to short the battery until much higher capacities, it seems clear that the problem must be elsewhere.
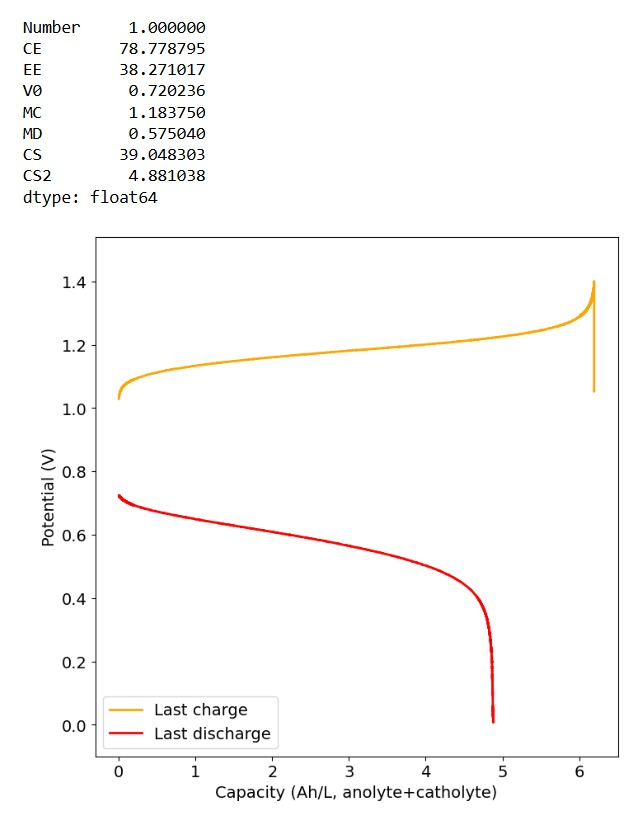
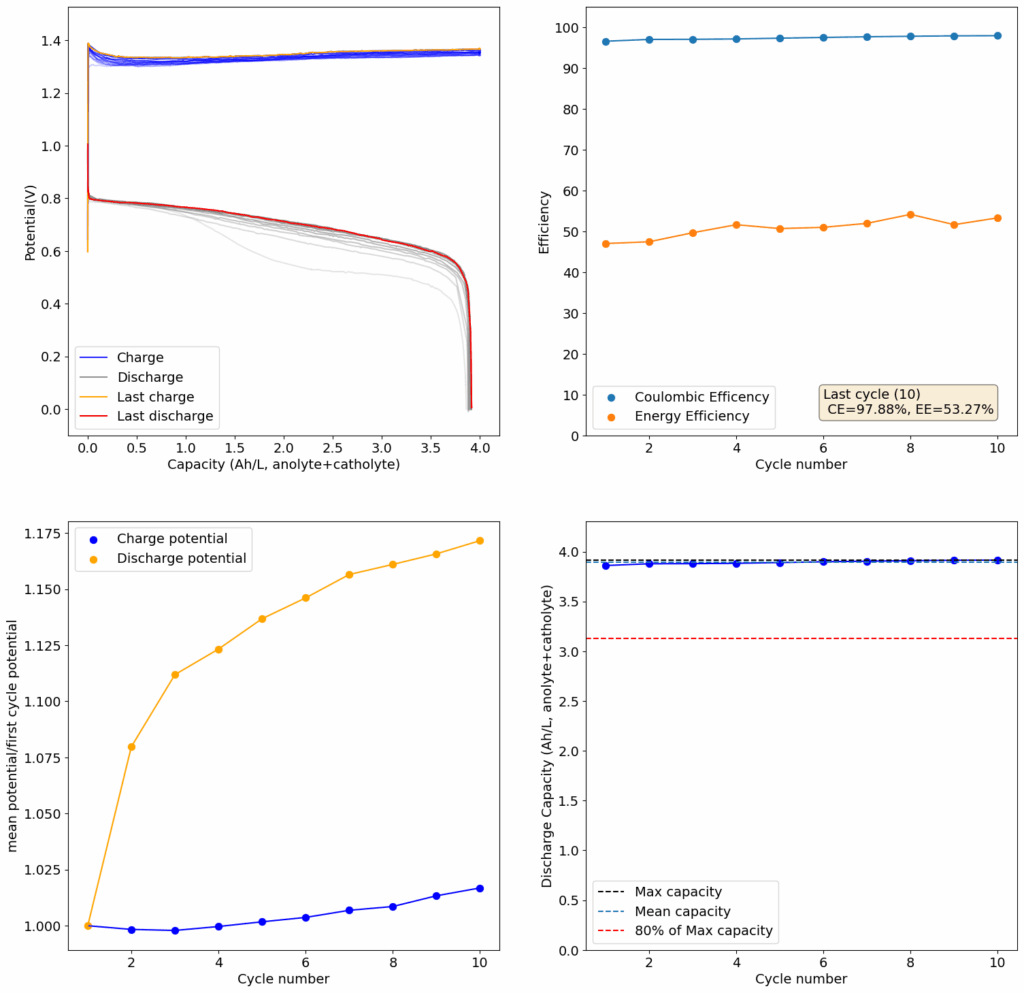
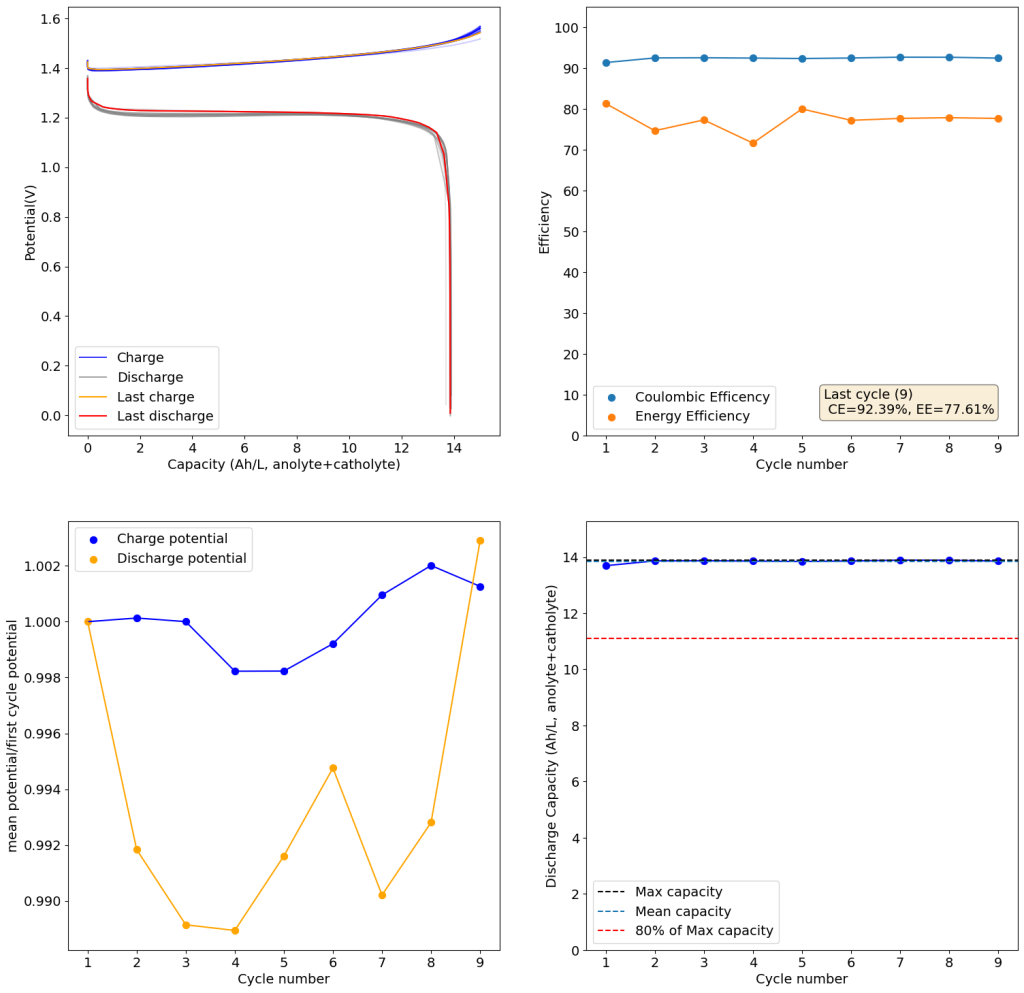
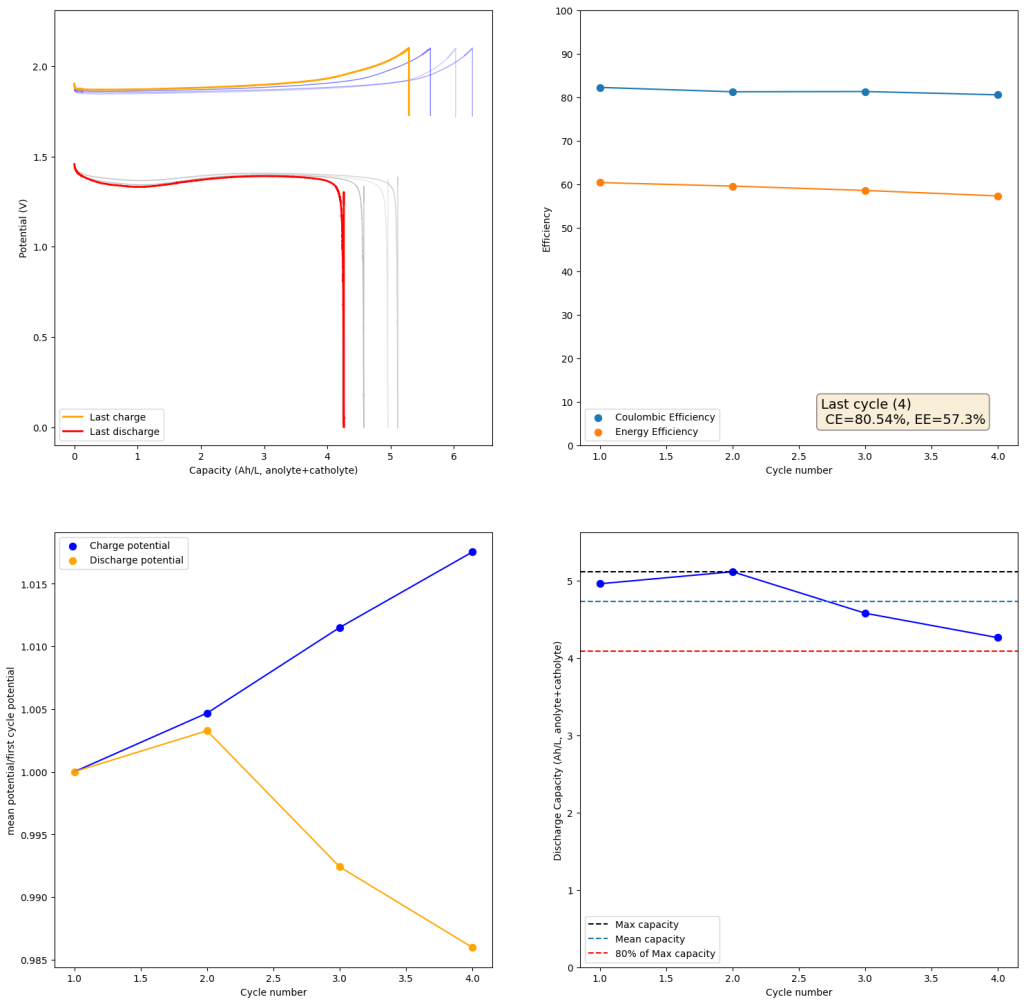
To test this hypothesis I tested the reversibility at 50% of the SOC. It is clear that the deterioration slows down at this point. It is also clear that my cathode – being normal felt – is way less electrochemically active than the carbon nanotube and N-doped felt that is actually used by the Chinese research group. This makes me believe that sulfamate starts degrading at high SOC values, perhaps because N-Br sulfamate starts becoming so concentrated that double bromination becomes possible and then the double brominated N sulfamate is much more likely to decompose with degradation of the sulfamate, possibly into sulfate, ammonium and other brominated side products, like bromate or hypobromous acid. Perhaps the fancy cathode of the Chinese research group has much faster kinetics and is able to handle much faster Br transfers into sulfamate without exposing already brominated sulfamate to double brominations. However, since they don’t charge to the Nernst limit, it makes me believe that they still saw this when they tried charging to higher potentials, hence they didn’t.
Perhaps the most important fact is that capacity recovers if you add more sulfamate, which pretty much confirms that the problem is due to sulfamate degradation.
The above implies that sulfamate, while able to support Zn-Br chemistry, is not as stable as it seems on the paper. Careful control over the charged capacity is needed and cathodes that allow very good kinetics for the bromination of the sulfamate are also required. Without significant engineering of the cathode material, it seems that you are limited to around 50% of the SOC – based on the sulfamate – if you want to avoid degradation of the sulfamate as a function of time.
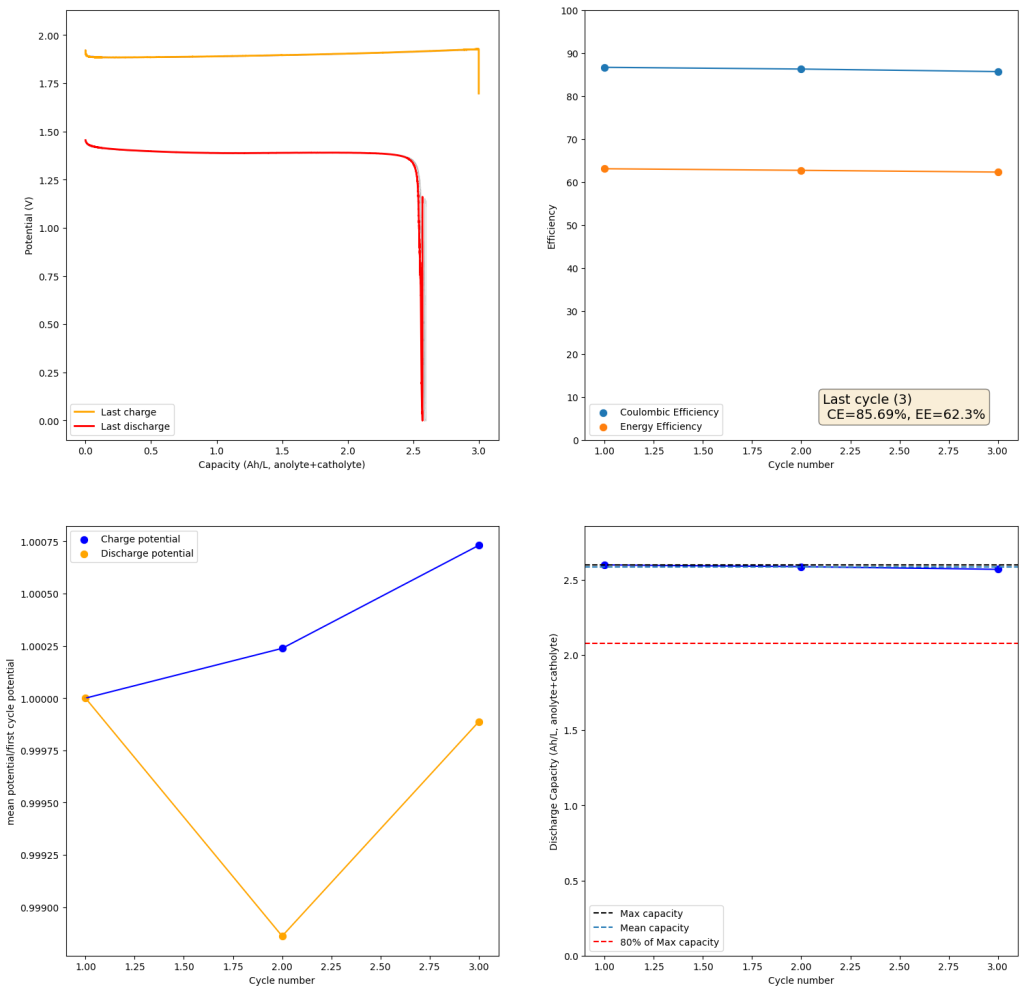
Also, capacities reported by the Chinese group seem to be based only on their catholyte volumes, therefore you have to divide all their values in half if you want to make real comparisons to Ah/L values. They still reach very high capacity values, very close to the actual 100% SOC levels for these systems, although without ever taking the batteries to the Nernst limit. My battery has much higher internal resistance than theirs, which also explains a lot of this difference (as my kinetics are slower, my potential increases much earlier).
Long story short, you cannot just add sulfamate to a Zn-Br electrolyte and expect the battery to work like magic. As it is always the case in batteries, the devil is in the details.